Getting Started With GerryChain
This guide will show you how to start generating ensembles with GerryChain.
What You’ll Need
Before we can start running Markov chains, you’ll need to:
Install
gerrychainfrom PyPI. See the installation guide for instructions.Download this example json of Pennsylvania’s VTDs (about 20 MB; use the download button on that page).
Open your preferred Python environment (e.g. JupyterLab, IPython, or a
.pyfile in your favorite editor) in the directory containing thePA_VTDs.jsonfile that you downloaded.
Throughout this guide, we will assume that the user is working with a jupyter notebook or a python script file (a *.py file). We will also assume that the end user is working through this guide is familiar with, but still relatively new to Python.
Also please note that, while this guide makes use of the “propose_random_flip” proposal function, this is not the only proposal function available in GerryChain (in fact, it is the one that we use the least). We are only using it here because it provides for a simple example of how to run a Markov chain.
Note
If you are having any trouble getting the materials on this tutorial to work, please consult the installation guide first. Working through its installation checks will confirm that your environment is set up the way this guide expects, and will usually pinpoint the problem.
If you’re still having issues, please open an issue so we can fix the guide for the next person, or send us a message at code[at]mggg[dot]org.
Setting Up the Chain
The central object of GerryCahin is the MarkovChain, so we shall begin there. A chain needs to
know how many steps to take and, if you care about reproducibiliy, it requires either a random
seed or a random number generator object.
Once these are specified, we can update the central MarkovChain object to add the rest of the
information necessary to run the chain:
Initial Partition
Proposal function
Updaters
Acceptance constraints
Note
Older versions of GerryChian required the reverse paradigm: build all of the components for running the chain and then use them to construct the
MarkovChainobject. Users reported that having to remember all of the components that are needed before making the chain as a bit confusing. The latest version should also produce meanigful warnings that inform the user of any components that are missing.
from gerrychain import Graph, MarkovChain, Partition
from gerrychain.updaters import Tally, cut_edges

chain = MarkovChain(
    total_steps=1000,
    rng=2024,  # a seed for the random number generator
)

# Load the graph in from the provided json file
graph = Graph.from_json("./PA_VTDs.json")

# The partition the chain starts from
chain.initial_partition = Partition(
    graph,
    assignment="2011_PLA_1",
)

# Quantities we want tracked on every partition the chain produces
chain.add_updaters(
    {
        "population": Tally("TOT_POP", alias="population"),
        "cut_edges": cut_edges,
    }
)
Here’s what’s happening in this code block.
We create the
MarkovChainfirst, giving it onlytotal_stepsandrng. Everything else is optional at this point and can be filled in as we go. Building the chain up this way keeps each piece of configuration next to the explanation of what it does, and it means you never have to assemble every argument before you can start.The
Graph.from_json()classmethod creates a GerryChainGraphof the precincts.Note that this JSON file was previously created by creating a GerryChain
Graphfrom a shapefile (if you don’t know what a shapefile is, don’t worry), and then writing that graph out as a JSON file. We usedGraph.from_file()on the shapefile obtained from mggg-states/PA-shapefiles . By default, thefrom_file()method copies all of the data columns from the shapefile’s attribute table to theGraphobject as node attributes. We then usedGraph.to_json()to create the JSON file.We then assign the chain’s
initial_partition, the districting plan the chain starts from. ThePartitionclass takes two arguments here:- graph
A graph.
- assignment
An assignment of the nodes of the graph into parts of the partition. This can be either a dictionary mapping node IDs to part IDs, or the string key of a node attribute that holds each node’s assignment. Here
assignment="2011_PLA_1"tells thePartitionto assign nodes by their"2011_PLA_1"attribute.
Finally,
chain.add_updaters()registers the quantities we want computed for every partition the chain visits. Updaters can be added before or after the initial partition is assigned; the chain applies them either way, and every partition it generates inherits them.- updaters
Tally("TOT_POP", alias="population")sums the"TOT_POP"node attribute within each district and stores it under"population".cut_edgesrecords the edges that cross a district boundary.
With the "population" updater configured, we can see the total population in
each of our districts. The initial partition is available on the chain as
chain.initial_partition.
for district, pop in chain.initial_partition["population"].items():
    print(f"District {district}: {pop}")
District 3: 706653
District 10: 706992
District 9: 702500
District 5: 695917
District 15: 705549
District 6: 705782
District 11: 705115
District 8: 705689
District 4: 705669
District 18: 705847
District 12: 706232
District 17: 699133
District 7: 712463
District 16: 699557
District 14: 705526
District 13: 705028
District 2: 705689
District 1: 705588
Notice that partition["population"] is a dictionary mapping the ID of each district to its total
population (that’s why we can call the .items() method on it). Most updaters output values in this dictionary format.
And that is it! From here, you can move on to configuring and running the chain.
Running the Chain
Our chain has now been configured to know where it starts and what to track, but it does not yet know how to propose a new plan, which plans count as valid, or when to accept one. Those are the last three pieces.
from gerrychain.accept import always_accept
from gerrychain.constraints import single_flip_contiguous
from gerrychain.proposals import propose_random_flip

chain.proposal_fn = propose_random_flip
chain.add_constraint(single_flip_contiguous)
chain.acceptance_fn = always_accept
A chain needs five things in total, and we have now supplied all of them.
- proposal_fn
A function called as
proposal_fn(current_state, rng=chain.rng)that returns a newPartition. Here we’ve used thepropose_random_flipproposal, which proposes that a random node on the boundary of one district be flipped into the neighboring district.
- constraints
Binary constraints (functions that take a partition and return
TrueorFalse) that together define which districting plans are valid. Here we’ve added just one,single_flip_contiguous, which checks that each district in the plan is contiguous. This particular constraint is optimized for the single-flip proposal function we are using (hence the name).Call
add_constraintagain, oradd_constraintswith several at once, to require more. Each constraint is checked against the initial partition as soon as it is added, so a starting plan that violates one is reported immediately rather than when the chain runs.
- acceptance_fn
A function called as
acceptance_fn(proposed_state, rng=chain.rng)that returnsTrueorFalse. Herealways_acceptaccepts every valid proposal.
- initial_partition
The plan the chain starts from, which we assigned above.
- total_steps
The number of steps to take, which we passed when we created the chain.
We also gave the chain rng=2024 at the start. Each chain owns its randomness, so passing an
integer makes the run reproducible. See Reproducibility for
details.
Note that the order in which you assign attributes to your chain does not matter. The chain validates the whole configuration before it starts iterating to produce successive plans, so you can assign these in whichever sequence is convenient.
To start running your chain, just enumerate it:
for i, partition in enumerate(chain, start=1):
    if i <= 10:
        print(f"Step {i} population for district 1: {partition['population'][1]}")

print(f"... {i - 10} more steps omitted")
Step 1 population for district 1: 705588
Step 2 population for district 1: 705588
Step 3 population for district 1: 707401
Step 4 population for district 1: 707401
Step 5 population for district 1: 707401
Step 6 population for district 1: 707401
Step 7 population for district 1: 707401
Step 8 population for district 1: 707401
Step 9 population for district 1: 707401
Step 10 population for district 1: 708263
... 990 more steps omitted
Congratulations! You’ve run a Markov chain!
Working With Elections
Of course, gerrychain was build for analyzing districting plans, so it seems
like it would be important to be able to analyze election results. We can do this
by adding an Election object to our Partition as an updater. To do this, we’ll need
to import the Election class
and change around our initial partition a bit.
from gerrychain import Election
from gerrychain.constraints import contiguous

# Set up the election updater. We give the election a name ("SEN12") and tell it
# which node attribute in our graph holds the Democratic vote totals ("USS12D")
# and which column holds the Republican vote totals ("USS12R").
election = Election("SEN12", {"Dem": "USS12D", "Rep": "USS12R"})

chain_2 = MarkovChain(
    total_steps=1000,
    rng=2024,
)

chain_2.initial_partition = Partition(
    graph,
    assignment="2011_PLA_1",
)
chain_2.add_updaters(
    {
        "population": Tally("TOT_POP", alias="population"),
        "cut_edges": cut_edges,
        "SEN12": election,
    }
)

chain_2.proposal_fn = propose_random_flip
chain_2.add_constraint(contiguous)
chain_2.acceptance_fn = always_accept
The new chain is built exactly like the first one, with one extra updater. The election is
registered under the name "SEN12", so its results are available as partition["SEN12"] on every
partition the chain produces. We told gerrychain that the Democratic vote share, which we call
"Dem", is stored in the "USS12D" attribute of our file, and likewise that the Republican vote
share, which we call "Rep", is stored in the "USS12R" attribute.
This chain also swaps the constraint: contiguous checks contiguity for any proposal, rather than
assuming the single-flip proposal the way single_flip_contiguous does.
Now we can run it and print off some election data.
for i, partition in enumerate(chain_2, start=1):
    if i <= 10:
        print(
            f"Step {i} Democratic vote share for district 1: "
            f"{partition['SEN12'].percents('Dem')[1]:0.4f}"
        )

print(f"... {i - 10} more steps omitted")
Step 1 Democratic vote share for district 1: 0.4110
Step 2 Democratic vote share for district 1: 0.4110
Step 3 Democratic vote share for district 1: 0.4110
Step 4 Democratic vote share for district 1: 0.4110
Step 5 Democratic vote share for district 1: 0.4110
Step 6 Democratic vote share for district 1: 0.4110
Step 7 Democratic vote share for district 1: 0.4110
Step 8 Democratic vote share for district 1: 0.4110
Step 9 Democratic vote share for district 1: 0.4112
Step 10 Democratic vote share for district 1: 0.4112
... 990 more steps omitted
Coding note
The
:0.4fin the above code is a formatting string that tells Python to print the preceding number with four decimal places. This is just a formatting string, and is not specific togerrychain. Also, we have split the string onto different lines for readability since Python automatically concatenates adjacent strings.
Using DataFrames to Collect Information
Printing out data is nice, but it’s not very useful for analysis. Instead, it would
be good if we could collect data from our Markov chain in a list
and then convert it into a pandas DataFrame for analysis.
Here we collect the percentages of Democratic voters computed by our Election updater
and store them in a pandas DataFrame.
import pandas

d_percents = []
for partition in chain_2:
    # We use the sorted function here to ensure that the data is in the same order
    # as the districts assignments
    d_percents.append(sorted(partition["SEN12"].percents("Dem")))

data = pandas.DataFrame(d_percents)
Coding note
A more elegant way of achieving the same result is to use a list comprehension instead of a
forloop.data = pandas.DataFrame( [sorted(partition["SEN12"].percents("Dem")) for partition in chain_2] )
Important
The above code will collect data from a different ensemble than the previous
forloop. Each time we iterate through thechainobject, we run a brand new Markov chain (using the same configuration that we defined when instantiatingchain).
The pandas DataFrame
object also has many helpful methods for analyzing and plotting
data. For example, we can produce a boxplot of our ensemble’s Democratic vote percentage
vectors, with the initial 2011 districting plan plotted in red, in just a few lines of code:
import matplotlib.pyplot as plt

ax = data.boxplot(positions=range(len(data.columns)))
plt.plot(data.iloc[0], "ro")

plt.show()
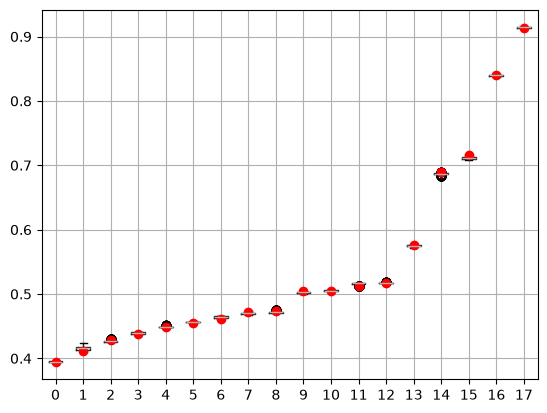
(Before you over-analyze this data, keep in mind that this is a toy ensemble of just 1000 plans created by single flips.)
Collecting data for long chains
The dataframe method is convenient when running short (under 20,000 step) chains, but can become cumbersome past that point. Often it is better practice to run and save the entire chain and then to recollect the data on the saved chain. See https://gerrytools.readthedocs.io/en/latest/ for more information on how to do this.
Next Steps
To see a more elaborate example that uses the ReCom proposal, see Running a chain with ReCom.
To learn more about the specific components of GerryChain, see the API reference.